Despite the fact that the peak of popularity of fashionable in 2016-2017 anti-stress toys began to subside, many are still looking for ways to create an original thing that will help you to spend time on long trips, long lines or in difficult situations. Naturally, this is a self-made spinner. How to create it at home, and what is needed for this - in more detail in our material.
What are spinners for and how do they work?
 Each twister dismantles the individuality of its owner.
Feedget spinner - This is a rotating flat or volumetric toy, which is popular with adults and children around the globe. Its main purpose is to occupy and divert. Someone thinks that spinner is usefulbecause you can distract from everyday and psychological problems, relieve irritability, get rid of excitement. Others assure that thanks to the turntable focus on the right thingsdistracting from all the excess. Anyway, the glory of the toy does not need explanation, because literally everyone loves it.

There are many forms of so-called hand twist. It will depend not only on the invented design, but also on the component parts that are in stock. To understand the specifics of the work when creating a spinner with your own hands, you need to know just a few important points.
Mandatory traditional spinner elements are:
- bearing;
- wings.
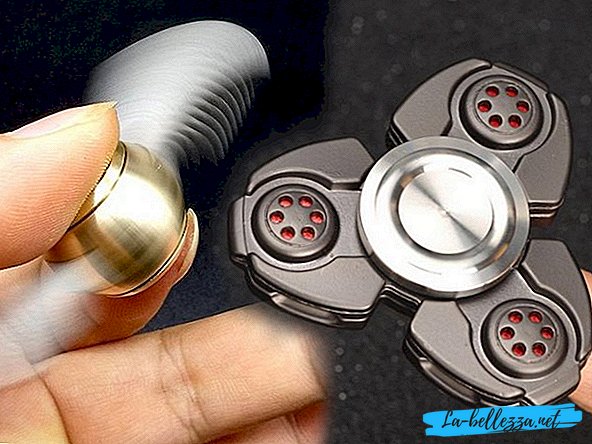
The most important part of the spinner is the bearing.It will depend on him how long and quickly the toy will spin, as well as its soundtrack and vibrations produced. In many homemade toys, bearings are often replaced with primitive toothpick designs., which also allow the wings to spin toys.
Wings, or petals, can be from two to six, but often you can find two or three petals. It is these elements of the spinner that give room for imagination, allow to embody bold ideas, to show individuality.
 The unusual design of one of the most primitive forms of toys - round.
The so-called krutilki made of plastic, metal, wood, cardboard and many other materials. Often materials are combined. Recently, plastic or metal toys with luminous wings.
 Products made of plastic, wood and copper.
The design of many do-it-yourself spinners is amazing. Many decorate their toys with interesting engravings, illustrations, icons. The model of a small spinner that fits in the palm of your hand allows you to characterize its owner without further ado.
 A sninch-shaped spinner.
  Fairy-tale illustrations and details look very interesting on spinners.
  Male design turntables.
  Recently the toys glowing in the dark are very popular.
  Feet-spinners in female design.
Today spinner can be bought in almost any store. There are models of budget, and there are expensive original or even design. But in order to stand out from the crowd, you need to make a certain effort, for example, to do an original thing with your own hands for yourself or your child, relative, friend (for example, as a gift). If such a fashionable product as a spinner was asked by a kid, so much the better, because it can be attracted to the creative process, starting with the choice of a model, and ending with the creation of a memorable toy.
General instructions before starting work
Before you start working on your spinner, you need to have an idea of what a person wants to receive as a result. To the result did not disappoint, you need to work on a simple scheme.
- Stage №1 - we select the model and design
Since there are countless possible models of spinners, and we are all different, and we like different things, then for a start, you can choose the appropriate model from the simple ones. This is to ensure that the process does not turn into a punishment. Or you can go the other way, and choose the most original model from a special material of unusual shape. This option is suitable for those who have already tried to create things with their own hands.
 Variants of creating a hand spinner with your own hands.
- Stage number 2 - draw and draw
To make it work, you should take care of the drawing on a 1: 1 scale. You can draw on paper the future model of the spinner, and you can search for ready-made drawings on the vast expanses of the Internet.
 Drawings and blanks.
- Stage number 3 - we harvest tools
Now that the creator has decided on the design, and the schematic is ready, you can begin to prepare all the necessary materials.
The first step is to purchase (or remove from the old technology) bearing. It can be made of metal or ceramic. The most acceptable option is a diameter of 2 mm. To ensure a pleasant pastime in the future, professionals advise remove grease from a part in the "tub" of gasoline before she gets into the toy. Why clean the bearing from lubrication? It makes the rotation slower, besides, it stains hands, clothes and furniture.
In addition to the prefabricated parts of the spinner, you will also need the following tools:
- Construction marker (pen, pencil, ordinary felt-tip pen);
- Scissors;
- Stationery knife;
- Decorative items (optional);
- Glue;
- Special tools to create the wings we need (tools for working on wood or metal).
 Preparatory stage.
- Stage number 4 - create spinner
When the training is over, you can safely begin to make a toy with your own hands. Next, we consider several popular options for creating spinners from various materials in several ways.
 Varieties of krutilok for hands created from improvised means.
Paper and cardboard spinner without bearing

The most popular option for those who are not in a hurry to run after the bearing and cut the squiggles from metal or wood is to make the first simple spinner from cardboard and paper. Do it yourself with your own hands is really easy, but if you show a little more imagination, then a simple piece of cardboard can turn into an original canvas for your favorite icons or drawings.
Tools for work:
- ruler;
- compass;
- pencil;
- a pen;
- scissors;
- stationery knife;
- cardboard;
- glue;
- toothpick;
- nut - 2 pcs.
Step by step course of work can be viewed on the video:
With plastic covers

Another simple way to create a spinner with your own hands, which will take a little longer, is a model of ordinary bottle caps. By the way, this method also does not require bearings. Here is a small step-by-step instruction.
Tools for work:
- caps - 4-6 pcs .;
- clay (can kinetic sand);
- glue gun;
- glue stick;
- lighter;
- awl;
- stationery knife;
- toothpick;
- scissors.
Working process:
- Three caps (or more, if the spinner has more wings) almost to the top to fill with clay. We fix it with a layer of glue from a pistol, which should fill the caps to the top.
- The main cap is left without aggregate. In it we make a hole with an awl in the very center. To this central part of the future spinner we glue the caps with clay on the sides. It is important to do this at an equal distance from each other.
- Take the glue stick and cut off two equal parts - approximately 1 cm each.
- Toothpick break in the center. We insert it into the central cover and attach the pieces of silicone rod to the ends so that it is convenient to hold the wood.
- Spinner do it yourself!
Wooden with bearing

Spinner made of wood - the most pleasant and affordable option that you can create with your own hands. A real lesson of work for adults and children!
Tools for work:
- Glue gun;
- Bearing 2 mm;
- Plywood sheet, thickness 5 mm;
- A few coins;
- Drill;
- Manual jigsaw;
- Clamp;
- Scissors;
- Sandpaper;
- Pencil or construction marker;
- Ready template spinner.
Working process:

- We print the scheme and cut it. We fasten it on the plywood sheet and draw around it. It is necessary to mark the places in each of the circles, where there will be holes.
- We drill through the door on the sides of the circles additional holes, allowing to cut a beautiful circle shape from inside the wing.
- Future spinner need to cut out of plywood jigsaw. Then carefully process the edges and surface of the sandpaper to a smooth surface.
- The bearing must be inserted into the hole prepared for it in the center. In case of difficulty, you can use a hammer and drive a metal element into a wooden one.
- Wings "Krutilki" need to weight - for this and need coins. You can glue the weights for each hole in the following order: a coin of five rubles, then two, and again five, as shown in the video.
- You can cover it with solid color paint, or you can decorate it in another interesting and original way - there is room for imagination, which is so nice to embody with your own hands.
Video tutorials on creating spinners
To get comfortable with the creation of a spinner with your own hands, you can familiarize yourself with some video tutorials on this topic. Terms of creation can be very different, as well as materials, and styles, but the home spinner can turn out no worse than the factory.
Here is another way to create paper twigs, this time in the form of a shuriken:
Minimalistic spinner made of bearings and clamps:
But a great option "turntables" for girls: